Choose an air fryer that fits your counter or storage space, serves the number of people you cook for, and can be used with safe clearance around it. This guide is for beginners outfitting a small apartment kitchen, dorm-style cooking area, or compact home. Plan on 30-60 minutes to measure, compare models, and choose a setup; cooking time depends on the food.

Get kitchen staples and gadgets delivered free with Prime
- Fast, free delivery on millions of items
- Prime Video, Amazon Music and more included
- Member-only deals all year

Chefman Compact Air Fryer 3.5 QT
- ✔ Capacity: 3.5 quarts
- ✔ Dimensions: 14.29 × 9.64 × 8.46 inches
- ✔ Maximum temperature: 450°F

CHEFMAN 2 Qt Mini Air Fryer
- ✔ Capacity: 2 quarts
- ✔ Dimensions: 10 × 10 × 8.3 inches
- ✔ Maximum temperature: 400°F
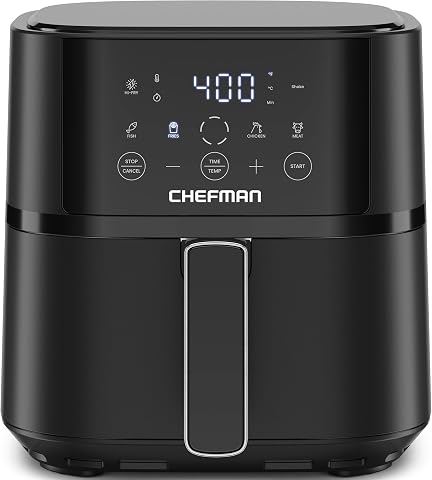
Chefman Air Fryer 4 QT with Hi-Fry Technology
- ✔ Capacity: 4 quarts (also listed as 3.7 liters)
- ✔ Dimensions: 13.82 × 10.04 × 10.24 inches
- ✔ Maximum temperature: Description says Hi-Fry reaches 450°F; specifications list 400°F
Difficulty: Beginner | Time: 30-60 minutes to measure, compare, and set up; cooking time varies by recipe
What You’ll Need
Tools & Materials:
- Tape measure or ruler
- Paper or phone notes for recording measurements
- Access to the air fryer’s product dimensions and manual
Knowledge:
- Basic familiarity with your kitchen counter and electrical outlets
- An estimate of how many portions you usually cook at once
Check the manual for clearance, ventilation, and electrical requirements before choosing a spot. Appliance dimensions alone do not show how much room you need to open a drawer or remove a basket.
Chefman Compact Air Fryer 3.5 QT
For most small kitchens, this model makes the strongest compromise between basket room and counter width. Its 3.5-quart capacity is larger than the Mini’s 2 quarts, while the listed 9.64-inch width is narrower than the 4-quart model’s 10.04 inches. It also reaches 450°F and offers Air Fry, Bake, Dehydrate, and Frozen functions, making it the more flexible pick if one appliance needs to cover several jobs.That flexibility has a spatial catch: its listed depth is 14.29 inches, the greatest of these three. We should measure the counter from front to back before choosing it, especially if it will sit near a wall or share a crowded worktop. The 3.5-quart basket is described as serving up to four, but anyone regularly cooking for a larger group should plan for batches. Compared with the 4-quart model, this one gives up a little capacity in exchange for more cooking modes and a narrower width; compared with the Mini, it needs substantially more room but is better suited to varied meals.The touchscreen and digital display make settings easy to adjust, and the ceramic nonstick coating is described as PFAS-free. Basket and crisper rack parts are top-rack dishwasher safe. Choose it when versatility matters as much as compactness; skip it if your storage space is shallow or you only need the smallest appliance for occasional solo portions.
Pros:
- Narrow 9.64-inch listed width
- Four functions: Air Fry, Bake, Dehydrate, and Frozen
- 450°F maximum temperature
- PFAS-free ceramic coating and dishwasher-safe basket parts
Cons:
- 14.29-inch depth can be challenging on a crowded counter
- Less capacity than the 4-quart model
- More functions may go unused if we only air fry simple meals
Best for: Small households that want multiple cooking modes and can accommodate a deeper appliance.
Not ideal for: Buyers with shallow counters or cabinets, or anyone who only needs a tiny single-person fryer.
Bottom line: We recommend it as the most adaptable small-kitchen choice if its deeper footprint fits your counter.
“We recommend it as the most adaptable small-kitchen choice if its deeper footprint fits your counter.”
CHEFMAN 2 Qt Mini Air Fryer
When the main requirement is a small appliance that can stay on a crowded counter or fit into a cabinet, the 2-quart Mini has the clearest purpose. Its listed dimensions are 10 × 10 × 8.3 inches, and its square basket is designed to make use of that compact space. At 900 watts, it is also the lowest-powered option in this comparison, which may suit buyers looking for a simple, smaller-capacity appliance rather than a larger multi-function cooker.The compromise is capacity. Chefman positions it for meals for one or two, so it is less practical than the 3.5- and 4-quart models when cooking for several people or preparing larger batches. It offers adjustable digital time and temperature, a maximum setting of 400°F, and an audible reminder to shake food. The shake reminder is a useful cue, but it does not replace checking food as it cooks. This model does not list the extra bake, dehydrate, and frozen-food programs found on the 3.5-quart option, nor the 4-quart model’s Hi-Fry finish.For a kitchenette, dorm, or solo household, those omissions may be easy to accept in return for a genuinely smaller footprint. Compared with the larger Chefman fryers, it is the easiest to place, but it is also the one most likely to require multiple batches. The basket and rack are dishwasher safe, and automatic shutoff adds a practical safety feature. Choose it when counter space is the priority and portions are modest; skip it if you want one-batch family cooking.
Pros:
- Smallest listed dimensions in this lineup
- Square 2-quart basket uses its compact space efficiently
- Digital time and temperature controls with shake reminder
- Dishwasher-safe basket and rack
Cons:
- 2-quart capacity restricts batch size
- Maximum temperature is 400°F, below the other two models
- Fewer listed cooking functions than the 3.5-quart option
Best for: One or two people with limited counter or cabinet space who mostly cook modest portions.
Not ideal for: Families, batch cooks, or buyers who want several appliance functions in one unit.
Bottom line: We’d choose the Mini when saving space matters more than cooking larger portions or using extra functions.
“We’d choose the Mini when saving space matters more than cooking larger portions or using extra functions.”
Chefman Air Fryer 4 QT with Hi-Fry Technology
This 4-quart model is the capacity choice for small kitchens where the appliance still needs to handle meals for two to four people. Its listed footprint is 13.82 inches deep and 10.04 inches wide, so it is slightly wider than the 3.5-quart model and substantially deeper than the Mini. In return, we get the largest stated capacity in this group and a basket intended for more substantial portions.The differentiating feature is Hi-Fry technology, which raises heat to 450°F during the final two minutes for a crisp finish. That can be useful for foods where texture matters, while four presets and touchscreen controls keep routine cooking straightforward. Compared with the 3.5-quart model, it gives up the additional bake, dehydrate, and frozen functions; compared with the Mini, it is a more capable batch cooker but takes considerably more counter and storage space.We should note a discrepancy in the supplied information: the product description says it reaches 450°F for Hi-Fry, while the specifications list a maximum temperature of 400°F. Buyers who need a specific temperature setting should confirm the product details before purchase. The listed height is 10.24 inches, which could also make it harder to store under low shelves than the shorter Mini or 3.5-quart model. Its basket and rack are dishwasher safe, and automatic shutoff is included. Pick this one if extra basket room and a crisping finish matter more than extra cooking modes or the smallest footprint.
Pros:
- Largest stated capacity in this comparison at 4 quarts
- Hi-Fry feature offers a 450°F finishing boost per product description
- Four presets and touchscreen controls
- Dishwasher-safe basket and rack with automatic shutoff
Cons:
- Deeper and taller than the other listed options
- Does not list the 3.5-quart model’s four cooking functions
- Supplied details conflict on maximum temperature
Best for: Households of two to four that want more basket capacity and a high-heat finishing feature.
Not ideal for: Very tight counters, low-clearance cabinets, or buyers who want bake, dehydrate, and frozen programs.
Bottom line: We’d pick the 4-quart model for larger batches and crisp finishing, after confirming the temperature specification and measuring storage clearance.
“We’d pick the 4-quart model for larger batches and crisp finishing, after confirming the temperature specification and measuring storage clearance.”
As an Amazon Associate we earn from qualifying purchases.
Before You Start
Decide whether the air fryer will stay on the counter or be stored between uses. A model that fits in a cabinet may still be awkward to lift or too hot to put away immediately after cooking. Leave space for the basket to slide out and for hot parts to rest. Use the manufacturer’s clearance guidance, and keep the appliance away from walls, curtains, paper, and other heat-sensitive items.
Air fryers need a stable, heat-resistant surface and a suitable outlet. Do not place one beneath low cabinets unless the manual permits it. Avoid planning to use an extension cord unless the manufacturer explicitly allows it.
Step-by-Step Instructions
Step 1: Measure the available counter or storage space
Pick the location where you expect to use or store the appliance. Measure its width, depth, and height, then note nearby cabinets, shelves, and outlets. If you plan to store it, measure the cabinet opening as well as the shelf depth, and check whether you can lift the appliance in and out comfortably.
Tip: Include room for the handle, power cord, and basket to pull out. Follow the manual’s required open space around the appliance.
Check: You have written down usable dimensions for the appliance footprint and the space needed to operate or store it.
Step 2: Estimate the portions you need
Write down how many people you usually cook for and the foods you want to make. A compact basket may work for one or two portions, while larger households or foods that need a single uncrowded layer may call for a wider basket or more cooking batches. Check the usable basket capacity and shape, not just the advertised capacity.
Tip: Capacity labels do not guarantee that a full basket will cook evenly. For crisp results, many foods need space for hot air to circulate and may need shaking or turning partway through cooking.
Check: You know your usual portion count and can name several foods the appliance should handle.
Step 3: Compare models by fit and everyday use
Compare the product dimensions, basket capacity, wattage, controls, and cleaning instructions for models that meet your portion needs. Check the manual or manufacturer’s listing for clearance requirements and the power supply. Look at whether the basket, tray, or other removable parts are dishwasher-safe, and confirm there is a place to wash and dry them.
Tip: A tall model can fit a narrow counter but may not clear overhead cabinets. A wide drawer may be harder to store in a shallow cabinet.
Check: Your shortlist includes models that fit the measured location, suit your portions, and meet the manufacturer’s setup requirements.
Step 4: Choose a practical storage plan
Choose a model and decide whether it will live on the counter or be stored after it cools. If storing it, check the appliance weight and cord storage, and make sure the basket and accessories have a nearby home. Do not plan to put a hot appliance in a cabinet or carry it by a loose drawer or handle unless the manual says that is safe.
Tip: If lifting the unit would be difficult, favor a smaller appliance that can stay in a permitted counter spot.
Check: You can reach the appliance, remove its basket, and store its parts without blocking your normal kitchen work.
Step 5: Set up the appliance safely
Place the air fryer on a level, heat-resistant surface near an appropriate outlet. Position it according to the manual’s clearance rules, with the air outlet clear and the basket able to slide out fully. Keep the cord away from the appliance’s hot surfaces, sinks, and walkways. Wash removable parts as directed before first use.
Tip: Do not operate the appliance under a cabinet or near flammable items unless the manual permits that location.
Check: The appliance sits steadily, the basket opens fully, the vent is unobstructed, and the cord reaches without tension.
Step 6: Cook a small first batch
Choose a simple recipe that matches the appliance manual. Preheat only if the recipe or manufacturer calls for it. Arrange food in a loose layer where possible, set the recommended temperature and time, and shake or turn the food when directed. Check that food reaches a safe internal temperature with a food thermometer when appropriate.
Tip: Cooking times vary by model, food size, and starting temperature. Check early the first time you make a recipe, and add time in short increments if needed.
Check: The food is cooked through and browned to your preference, and you have recorded any time or temperature adjustment that worked.
Step 7: Clean and reset the cooking area
Switch off and unplug the unit if the manual instructs you to do so, then let it cool. Clean the basket and tray according to the care instructions; avoid abrasive tools or immersing electrical parts. Wipe the exterior and the counter, then return the appliance and accessories to their planned places once everything is cool and dry.
Tip: Removing grease and crumbs after each use helps prevent smoke and keeps the basket easier to clean.
Check: The basket and tray are clean and dry, the appliance is cool, and the area is ready for its next use.
Common Mistakes to Avoid
- Buying by capacity alone and discovering the appliance does not fit. — Measure the full footprint, height, basket pull-out space, and required ventilation clearance before ordering.
- Choosing a basket that is too small for the portions or foods you cook. — Match usable basket shape and batch size to your usual meals; plan for multiple batches if needed.
- Crowding the basket to avoid cooking in batches. — Follow recipe guidance, leave room for airflow, and shake or turn food when directed.
- Storing the appliance while it is hot or damp. — Let the unit cool fully and dry removable parts before putting them away.
Troubleshooting
Problem: The appliance fits on the counter, but the drawer cannot open fully.
Solution: Move it to a location with enough operating clearance, or select a model with a different basket orientation. Recheck the manual’s space requirements.
Problem: Food comes out soft or unevenly cooked.
Solution: Cook a smaller batch, spread food in a looser layer, shake or turn it during cooking, and check the recipe’s temperature and timing.
Problem: The appliance produces smoke during cooking.
Solution: Stop cooking if smoke is heavy, switch off the unit, and follow the manual’s safety guidance. Once cool, clean grease and crumbs from removable parts; for fatty foods, use the manufacturer’s recommended method.
Problem: The basket or tray is difficult to clean.
Solution: Soak removable parts if the manual allows it, then use a soft sponge and suitable dish soap. Avoid metal utensils and harsh cleaners that can damage coatings.
What Success Looks Like
You have an air fryer that fits its intended location with the required clearance, can be reached and opened comfortably, and matches your typical portions. The outlet and surface meet the manufacturer’s requirements. A test batch cooks through, removable parts can be cleaned as directed, and the appliance has a safe storage or counter plan.
Next Steps
Keep the manual and note successful cooking times for foods you make often. Clean the basket and tray after use, and check the cord, plug, and cooking surface periodically for damage or buildup. If your needs change, reassess portion size and storage space before adding accessories or replacing the appliance.
Frequently Asked Questions
What size air fryer works for a very small kitchen?
Start with the space you have and the portions you cook. Compare the full appliance dimensions and basket pull-out clearance, then choose the smallest usable capacity that handles your usual meals. A compact unit may mean cooking multiple batches.
Can I put an air fryer under a cabinet?
Only if the manufacturer’s instructions allow it and the appliance has the required clearance. The vent releases hot air, so do not place it beneath cabinets by assumption. Use a different location if the manual’s spacing cannot be met.
Can I store an air fryer in a cabinet between uses?
Yes, if the appliance fits and can be lifted safely. Let it cool fully, clean and dry removable parts, and follow the manual’s storage instructions. Check that the cord and accessories do not catch or press against the unit.
Do I need to preheat an air fryer?
Follow the recipe and appliance manual. Some recipes call for preheating; others do not. If you skip it when a recipe specifies it, cooking time or browning may differ.
Why does food need room in the basket?
Air needs to circulate around food for more even browning. A crowded basket can leave food soft or uneven, so cook in batches when needed and shake or turn pieces as directed.