
Use this guide to choose kitchen gadgets that make your regular cooking tasks easier, then check that each item fits your kitchen and budget. It is for beginner home cooks and experienced cooks who want to fill gaps without collecting tools they rarely use. Allow 1-2 hours to review your cooking habits, compare options, and plan storage; shopping time may vary.

Get kitchen staples and gadgets delivered free with Prime
- Fast, free delivery on millions of items
- Prime Video, Amazon Music and more included
- Member-only deals all year
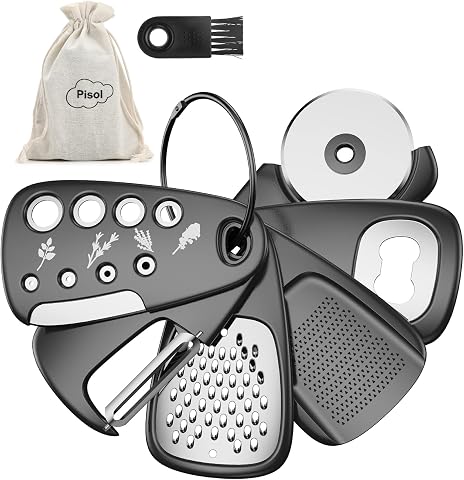
Pisol 6-Piece Space-Saving Kitchen Gadget Set
- ✔ Pieces: 6
- ✔ Included tools: Cheese grater, ginger grinder, pizza cutter, bottle opener, peeler, herb stripper
- ✔ Blade material: 430 stainless steel

TMEDW Nylon Meat Chopper and Masher, Black
- ✔ Material: Food-grade nylon
- ✔ Blade design: Five curved, beveled blades
- ✔ Maximum temperature: 430°F
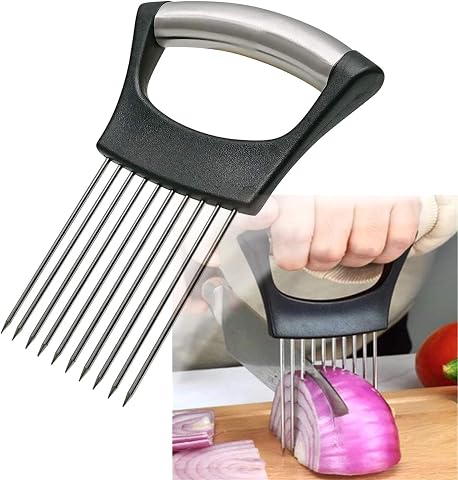
Stainless Steel Onion Slicing Holder
- ✔ Materials: Alloy steel, polycarbonate, stainless steel
- ✔ Blade material: Stainless steel
- ✔ Handle: Extra-thick plastic, non-slip
Difficulty: Beginner | Time: 1-2 hours
What You’ll Need
Tools & Materials:
- A list of meals or recipes you cook often
- A measuring tape or the dimensions of your storage space
- A budget range
- A notes app or paper for comparing options
Knowledge:
- Basic familiarity with your cooking routine
- The number of people you usually cook for
Start with tasks you repeat, such as chopping, measuring, blending, or turning food. A gadget is useful when it solves a specific problem you have often. You do not need a large collection to cook well.
Pisol 6-Piece Space-Saving Kitchen Gadget Set
For home chefs who want several small prep jobs covered in one purchase, the Pisol six-piece set has the broadest role in this lineup. It brings together a cheese grater, ginger grinder, pizza cutter, bottle opener, peeler, and herb stripper, so we can reach for one grouped set across ingredients and meal stages. Its stackable design also helps keep the tools together in a crowded drawer or cabinet, an advantage neither single-purpose gadget can match.The tradeoff is that breadth depends on whether these are the tools we actually use. A cook who mainly wants help with ground meat will get more direct utility from the TMEDW chopper, while someone focused on safer onion slicing may prefer the QPEY holder. The Pisol set also has ABS plastic handles; they keep the tools lightweight, but may not feel as durable as metal-handled alternatives. The listed dimensions are compact, though the set’s six separate pieces still need a home. For a beginner or a cook setting up a practical kitchen, the variety makes it the most adaptable starting point here.
Pros:
- Six distinct tools cover several common kitchen tasks.
- Stackable design helps keep the set together and save storage space.
- 430 stainless steel blades support peeling, slicing, and grating tasks.
- Dishwasher-safe care is listed for straightforward cleanup.
Cons:
- The set is limited to its six included tools.
- Lightweight ABS handles may be less durable than metal handles.
Best for: Home cooks and beginners who regularly grate, peel, open bottles, strip herbs, or cut pizza and want those manual tools stored together.
Not ideal for: Cooks seeking one sturdy, specialized utensil for frequent ground-meat prep, or buyers who need tools beyond the six included functions.
Bottom line: We recommend the Pisol set for home chefs who value broad everyday utility and organized storage more than specialization.
“We recommend the Pisol set for home chefs who value broad everyday utility and organized storage more than specialization.”
TMEDW Nylon Meat Chopper and Masher, Black
When a recipe begins with browning ground meat, a dedicated chopper can be more useful than a drawer full of general gadgets. The TMEDW tool’s five curved, beveled blades are shaped to break up meat and also mash or mix other foods. Its nylon construction is described as non-scratch, which makes this the more suitable option of the three for cooks who want to work directly in nonstick cookware. The stated 430°F heat resistance gives a clear upper limit to consider when using it around a hot pan.That focus is also its main limitation. Unlike the Pisol set, it does not peel, grate, or cut; unlike the QPEY holder, it does not steady food for slicing. Nylon may also feel less rigid than a metal utensil, and the tool is designed primarily for chopping and mashing rather than cutting. For someone who often cooks taco filling, sauces, or other dishes with ground meat, its task-specific shape earns a place. For occasional use or a kitchen that needs broad tool coverage, the Pisol set offers more ways to help.
Pros:
- Five curved, beveled blades are designed to break up ground meat efficiently.
- Nylon construction is described as non-scratch for nonstick cookware.
- Rated for use up to 430°F.
- Non-slip ergonomic handle and dishwasher-safe cleaning.
Cons:
- Nylon may be less rigid than metal utensils.
- Its design focuses on chopping and mashing rather than cutting.
Best for: Home chefs who often brown ground meat or mash and mix foods in nonstick cookware.
Not ideal for: Cooks looking for a cutting tool, a metal utensil with greater rigidity, or a gadget that performs many unrelated prep tasks.
Bottom line: We’d choose the TMEDW chopper when ground-meat prep in nonstick pans is a recurring job and broad versatility is less important.
“We’d choose the TMEDW chopper when ground-meat prep in nonstick pans is a recurring job and broad versatility is less important.”
Stainless Steel Onion Slicing Holder
The QPEY holder addresses a different kind of prep frustration: keeping an onion or another suitable food steady while we slice it. Its stainless steel tines hold food in place to support more uniform cuts, giving this compact manual gadget a narrower but useful role. Compared with the TMEDW chopper, it helps guide slicing rather than break up food in a pan. It can also be used to tenderize meat, adding a secondary function without turning it into an all-purpose utensil.The extra-thick, non-slip handle is intended to give us a more secure grip as we hold the food, and dishwasher-safe care keeps cleanup simple. Still, the supplied details do not state the holder’s dimensions, so we cannot judge its storage footprint as precisely as we can with the Pisol set or TMEDW chopper. It also requires manual handling and only earns drawer space if steady slicing is a task we want help with. Choose it as a focused prep aid; choose Pisol for a wider mix of jobs or TMEDW for ground-meat mixing.
Pros:
- Stainless steel tines help hold food steady for more uniform slicing.
- Can also be used to tenderize meat.
- Extra-thick non-slip handle is designed for a comfortable grip.
- Dishwasher-safe care is listed.
Cons:
- The product details do not specify its dimensions.
- Manual operation means we still guide and control each slice.
Best for: Home cooks who want help holding onions, vegetables, eggs, or meat steady during manual slicing or tenderizing.
Not ideal for: Buyers who need a multi-tool set, want an automated slicer, or need clearly specified dimensions before choosing a storage spot.
Bottom line: We’d add the QPEY holder when steadier slicing is the specific gap in our prep routine and we already own the broader basics.
“We’d add the QPEY holder when steadier slicing is the specific gap in our prep routine and we already own the broader basics.”
As an Amazon Associate we earn from qualifying purchases.
Before You Start
Check the space where each item will live before buying it. Measure shelves, drawers, counter clearance, and any cabinet height that may limit storage. If you are replacing a tool, note what failed: size, cleaning effort, durability, or poor performance. Use that detail to compare replacements.
For appliances, check the power requirements, available outlet space, and whether the product can be cleaned safely. Read the care instructions before purchase, especially for blades, electrical parts, and nonstick surfaces.
Step-by-Step Instructions
Step 1: List your regular cooking tasks
Write down the meals you prepare in a typical week and the tasks they involve. Include repeated jobs such as mincing garlic, weighing ingredients, draining pasta, blending soup, or grating cheese. Mark tasks that take too long, cause inconsistent results, or require an awkward workaround.
Tip:Use a week of meals as your reference rather than an ambitious recipe you make once a year.
Check: You have a short list of recurring tasks and at least one specific problem each potential gadget could solve.
Step 2: Set a budget and choose priorities
Choose a total budget and rank your problem tasks from most frequent to least frequent. Reserve money for items that solve high-frequency problems first. Set aside a small amount for accessories or replacements, and avoid spending the whole budget on a gadget for a task you rarely do.
Tip:Count how often a task comes up and how much effort a tool could save. A modest tool used several times a week can be a better purchase than a specialized appliance used a few times a year.
Check: Your list is ranked, and the top items fit within the amount you are willing to spend.
Step 3: Match each task to a gadget type
Connect each priority task to the simplest tool that can handle it. Consider a digital scale for accurate ingredient weights, an instant-read thermometer for checking food temperature, a sturdy grater for shredding, or an immersion blender for blending soup in its pot. Choose a countertop appliance only when its capacity or function serves a regular need.
Tip:Compare the proposed gadget with tools you already own. A sharp knife, mixing bowl, and measuring cups may already do the job well.
Check: Every item on your shortlist solves a named task, and you have removed tools that duplicate equipment you already have.
Step 4: Check size, capacity, and storage
Compare the product dimensions and capacity with your actual kitchen space and typical portions. Measure the storage location, and check whether the item needs room around it during use. For a food processor or blender, confirm that the bowl or jug holds enough for your usual batch without being cumbersome to store.
Tip:Look at the complete set of parts, including lids, blades, chargers, and attachments. Small pieces can take more drawer space than the main tool.
Check: You know where each shortlisted item will be stored and can use it without blocking your work area.
Step 5: Compare ease of use and cleaning
Read the product instructions and care details before buying. Check whether parts are dishwasher-safe, whether blades detach safely, and whether food can get trapped in seams or attachments. For powered tools, look for controls you can operate comfortably and parts that are easy to assemble correctly.
Tip:Do not assume that a dishwasher-safe label applies to the motor base, handle, or every attachment. Follow the manufacturer’s care instructions.
Check: You understand how to operate and clean the item, including which parts must stay dry or be washed by hand.
Step 6: Compare durability and replacement parts
Compare materials, warranty terms, and the availability of replacement parts for each serious candidate. Look for clear product specifications and instructions. For tools with blades, motors, or removable seals, check whether the parts that wear out can be replaced instead of requiring a new appliance.
Tip:Reviews can reveal recurring issues, but prioritize specific reports about performance, cleaning, or failure over vague ratings.
Check: You can explain why your preferred option suits your needs, and you know what support or replacement parts are available.
Step 7: Buy only the highest-priority items
Purchase the item or small group of items that addresses your top recurring problems. Check the model, included attachments, return terms, and total price before placing the order. Keep the receipt and product manual with your kitchen records.
Tip:Try the first purchase in your normal cooking routine before ordering optional accessories or more specialized tools.
Check: The items match your shortlist and budget, and you have the information needed to return to the instructions or request support.
Step 8: Set up and test each gadget
Wash or prepare the food-contact parts as directed, assemble the gadget according to its manual, and test it on a familiar recipe or task. Use a safe work surface, keep hands clear of blades, and avoid exceeding the stated capacity. Clean and store the item according to the care instructions after use.
Tip:For temperature tools, follow the manual’s guidance on placement and cleaning. For powered appliances, keep the motor base and cord away from water.
Check: The gadget performs its intended task, is comfortable to use, and can be cleaned and stored in the space you assigned.
Step 9: Review the purchase after several uses
After using the gadget several times, note whether it saves effort, improves consistency, and is easy enough to clean that you actually reach for it. Keep it accessible if it earns a regular place in your routine. Return or rehome it according to local rules if it does not meet the need and the return period allows.
Tip:Do not judge a specialized tool by one unusual recipe; test it on the task you bought it to handle.
Check: You can identify which tools contribute to your cooking routine and which ones do not justify their storage space.
Common Mistakes to Avoid
- Buying a gadget because it is popular or looks useful without identifying a recurring task. — Write down the specific job it will do and how often you do that job before comparing products.
- Choosing an appliance that is too large for the kitchen or the usual batch size. — Measure the storage spot and compare capacity with your regular recipes before purchase.
- Overlooking cleanup effort and then leaving the gadget unused. — Check care instructions, detachable parts, and food traps before buying.
- Buying several specialized tools before testing a simpler option. — Start with the most frequent problem and add another item only after the first proves useful.
Troubleshooting
Problem: The gadget does not fit in its planned storage space.
Solution: Check whether attachments or removable parts can be stored together elsewhere. If it remains awkward or blocks access to other tools, use the seller’s return terms if available and choose a smaller model.
Problem: The gadget is difficult to clean after use.
Solution: Follow the manual’s disassembly and cleaning instructions, and clean food residue promptly. If routine cleaning still takes too long, reassess whether the tool suits your cooking habits.
Problem: A powered gadget performs poorly or stops during use.
Solution: Unplug it, check the manual for assembly, capacity, and operating limits, and remove excess food if the instructions allow. Let the appliance cool if required. Contact the manufacturer if it still fails; do not open the motor housing.
Problem: You are unsure whether a gadget duplicates a tool you already own.
Solution: Try the existing tool on the same task before buying. Purchase a new item only if it offers a clear improvement in speed, safety, consistency, or effort.
What Success Looks Like
Your kitchen has a small set of gadgets tied to tasks you perform regularly. Each item fits its storage space, works for your usual portions, and can be cleaned according to its instructions. After several uses, you reach for it because it makes a particular job easier or more consistent.
Next Steps
Keep manuals and care details where you can find them, and clean tools after each use according to their instructions. Reassess your collection when your cooking routine or kitchen space changes. Before adding another gadget, identify the task it will solve and decide where it will live.
Frequently Asked Questions
Which kitchen gadgets should a home chef buy first?
Start with tools that address repeated problems. Many home cooks benefit from a digital scale, an instant-read thermometer, and a reliable grater, but the right first purchase depends on the meals you make and the equipment you already own.
Are expensive kitchen gadgets always better?
No. Compare performance, materials, cleaning effort, warranty, and replacement parts against your actual needs. A less expensive tool can be a good choice if it handles your regular task reliably.
Should I buy a food processor or an immersion blender?
Choose based on the work you repeat. A food processor handles tasks such as chopping, slicing, and mixing larger batches when the right attachments are included. An immersion blender is suited to blending soups or sauces in a pot or container. Check the capacity and cleaning steps for the exact model.
How can I tell if a gadget is safe to put in the dishwasher?
Read the product manual or care label for each part. The motor base, handles, blades, and attachments may have different cleaning rules, even when some removable parts are dishwasher-safe.
How many kitchen gadgets does a home chef need?
There is no fixed number. Keep tools that solve regular tasks, fit your storage, and are easy to maintain. A small collection that gets used is more practical than a large set of rarely used gadgets.