
Seals and gaskets are the main cause of blender leaks, and proper care is essential to keep your appliance running smoothly. Regularly inspect them for cracks, warping, or residue buildup, and replace worn parts promptly. Gentle cleaning with warm, soapy water and proper lubrication help maintain their condition. Taking these steps prevents leaks, protects your motor, and extends your blender’s life. Keep going for expert tips on maintaining seals and preventing leaks effectively.
Key Takeaways
- Regularly inspect seals and gaskets for cracks, warping, or residue buildup to prevent leaks.
- Properly install and lubricate seals with silicone grease to ensure a snug fit and durability.
- Promptly replace damaged or worn seals to avoid performance issues and water leaks.
- Use gentle cleaning techniques and dry thoroughly to maintain seal flexibility and prevent mold.
- Address persistent leaks by checking for proper fit, damaged components, or misalignment, and seek professional help if needed.

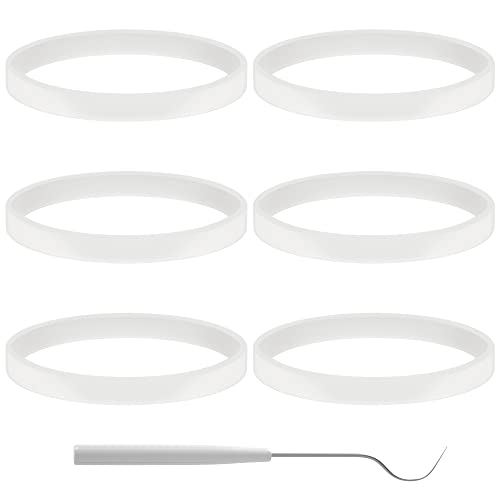
Blender Gasket Replacement Parts, Rubber Ring Seal Rings Blender Accessories for Oster and Osterizer Blender (4 Pieces)
【Compatible】:These blender replacement parts are compatible with Oster and Osterizer Blender. But not for Oster Pro 1200, In2uitive…
As an affiliate, we earn on qualifying purchases.
As an affiliate, we earn on qualifying purchases.
Why Seals and Gaskets Are Essential to Your Blender’s Performance

Seals and gaskets play a crucial role in keeping your blender functioning smoothly. They create a tight barrier that prevents leaks and keeps the motor and blades protected from spills. The seal’s longevity depends heavily on the gasket material, which must withstand frequent exposure to moisture, heat, and food particles. Choosing durable gasket materials like silicone or rubber ensures your seals stay effective over time. Properly maintained seals and gaskets maintain pressure, prevent contamination, and extend your blender’s lifespan. Without reliable seals, your appliance risks leaks, reduced performance, and costly repairs. Investing in quality gasket material and regular checks boosts seal longevity, ensuring your blender operates efficiently and safely for years to come. Additionally, considering innovative European cloud servers can offer sustainable and secure solutions for managing your appliance data and maintenance records. Regular inspection and replacement of worn seals can prevent leakage issues, and understanding gasket material durability can help you select the best options for long-term performance. Being aware of gasket material properties can further improve your maintenance practices and prevent common problems associated with gasket failure. Proper gasket selection and maintenance are essential for avoiding the common problem of blender leaks and ensuring optimal operation.
6 PCS Rubber Gaskets 10cm Sealing Gaskets White O-Ring Replacement Parts for Ninja Blender BL480 BL680 BL910 CT680
NICE QUALITY: 10 cm/ 3.9 inch in diameter, 1 cm/ 0.4 inch in height, made of food-grade silicone…
As an affiliate, we earn on qualifying purchases.
As an affiliate, we earn on qualifying purchases.
Signs Your Blender Seals and Gaskets Are Worn Out or Damaged

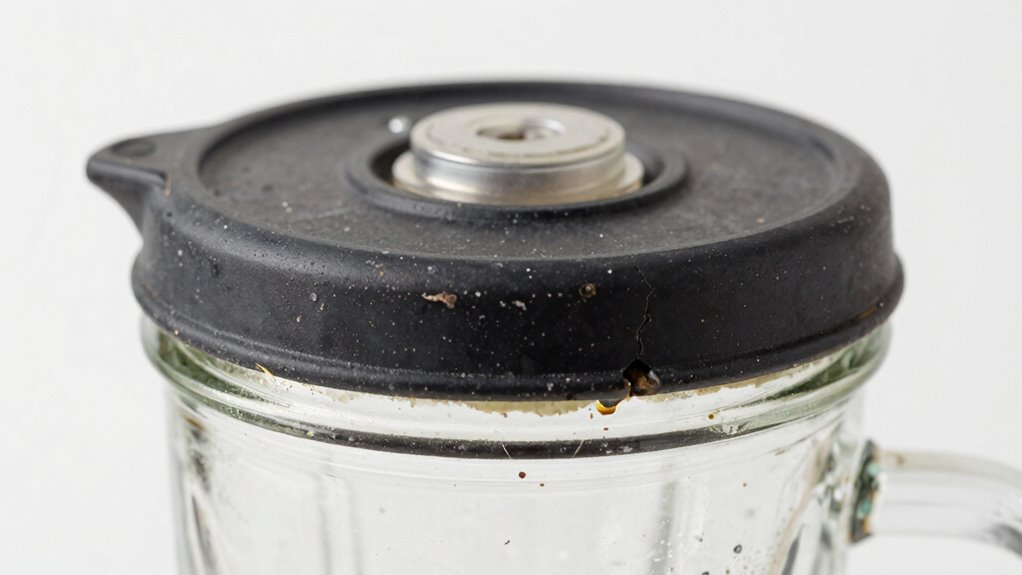
If your blender starts leaking or making unusual noises, it’s a strong sign that the seals or gaskets may be worn out or damaged. Over time, gasket materials can degrade, become brittle, or crack, leading to leaks. Check for visible signs of wear, such as cracks, tears, or warping around the seal area. If you notice liquid seeping from the base or pooling around the gasket, it’s time for a seal replacement. Damaged gaskets also cause inconsistent blending and noise. Regular inspection helps you catch issues early. Remember, using the right gasket materials during seal replacement guarantees a proper fit and prevents future leaks. Additionally, understanding vacuum features to consider can help you choose the best replacements and maintain optimal performance. Staying attentive to these signs keeps your blender functioning smoothly and extends its lifespan. Proper maintenance of seals and gaskets is essential to prevent leaks and ensure optimal performance.

for Oster Blender Replacement Parts Blender Ice Blade with Jar Base Cap and Two Rubber O Ring Seal Gasket Accessory Refresh Kit
【Package Included】: 1Pcs 4-point blade+1Pcs blender jar base+2Pcs seal gasket.
As an affiliate, we earn on qualifying purchases.
As an affiliate, we earn on qualifying purchases.
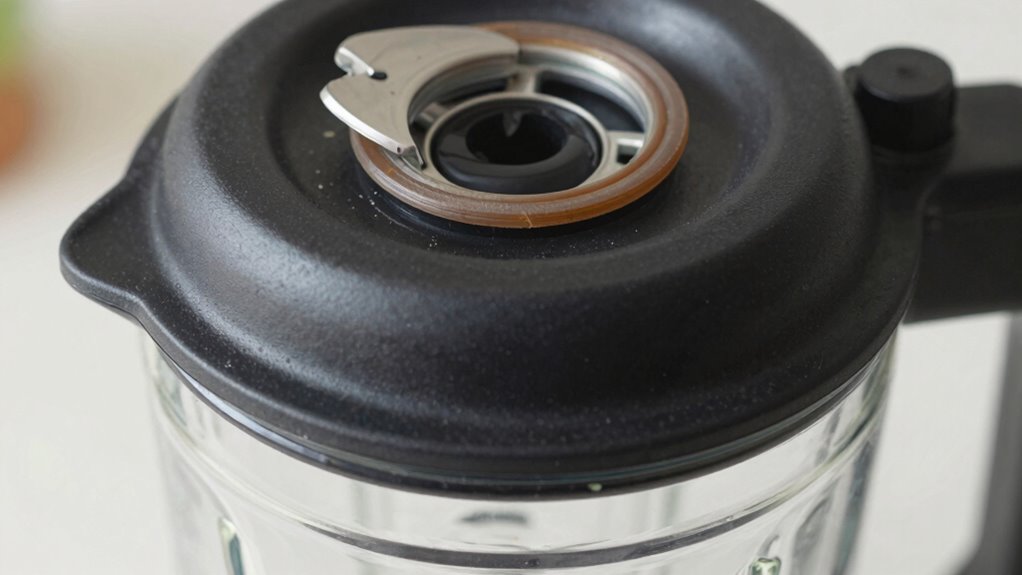
How to Inspect Blender Seals and Gaskets for Damage

Regularly inspecting your blender’s seals and gaskets helps prevent leaks and performance issues. During seal inspection, look for cracks, tears, or deformation around the seal’s edges. Check for any hardened or brittle areas, which indicate wear. Gasket inspection involves examining the gasket for signs of warping, cracks, or gaps that might prevent a tight seal. Ensure the gasket sits flush against the container and lid; if it’s loose or misshapen, it could cause leaks. Use a flashlight to better see small damages or debris that might interfere with sealing. If you notice any damage during your inspection, it’s best to replace the affected seal or gasket promptly to keep your blender functioning properly and avoid leaks.

Permatex 81101 O-Ring Lubricant Lubricates & Extends Life of O-Rings, Gaskets, Seals, Pressure Plugs & Valves, Pool Pumps & Filters, Water Faucet Valves, Food Grade Certified, 1 OZ
EXTENDS LIFE OF O-RINGS -Conditions & Seals O-Rings, Gaskets, Seals, Pressure Plugs & Valves, Water & Faucet Valves,…
As an affiliate, we earn on qualifying purchases.
As an affiliate, we earn on qualifying purchases.
How to Choose the Right Seals and Gaskets for Your Blender

Choosing the right seals and gaskets for your blender is essential to guarantee a tight, leak-free fit and maintain ideal performance. Start by considering the seal material, ensuring it’s compatible with your blender’s ingredients and temperature range. Silicone is popular for its durability and flexibility, while rubber offers good sealing properties. Next, evaluate the gasket design; it should fit snugly around the jar or blade assembly without excess compression. Look for gaskets that provide even sealing pressure and are easy to install or remove for cleaning. Proper selection of seal material and gasket design minimizes leaks and prevents damage to your blender’s motor and components. Additionally, understanding the importance of seal maintenance can extend the lifespan of your blender and ensure optimal operation. Regular inspection and timely replacement of worn seals help sustain sealing efficiency and prevent potential leaks. Maintaining proper installation techniques further ensures a secure fit and leak prevention. Being aware of seal compatibility with different blender models can also help you choose the most effective replacements. Taking these factors into account helps you choose the best replacements, ensuring your blender functions smoothly and leak-free.
Step-by-Step: Replacing Blender Seals and Gaskets

Before replacing your blender seals and gaskets, gather all the necessary tools to make the process smooth. Make sure you understand the proper removal steps so you don’t damage any components. With the right tools and techniques, you’ll be able to replace the seals efficiently and securely. Incorporating Free Floating concepts can help you ensure that your workspace remains organized and efficient during the replacement process. Additionally, understanding the methodical approach to testing and troubleshooting can prevent mistakes and ensure a successful repair. Proper piercing care and hygiene practices can also serve as a useful reminder to handle delicate components with care, reducing the risk of infection or damage during maintenance.
Gather Necessary Tools
To start replacing your blender’s seals and gaskets, gather the essential tools you’ll need for the job. You’ll want a screwdriver set to remove any screws securing the housing, along with a plastic pry tool to gently lift components without damage. Have a clean cloth ready to wipe surfaces, and consider a small brush for cleaning gasket grooves. For seal replacement, select the right type and size of seal suited to your blender model—gasket selection matters for a secure fit. A pair of needle-nose pliers can help remove stubborn parts, and some silicone grease can ease seal installation and improve longevity. Ensuring you have these tools on hand streamlines the process and helps prevent damage during gasket replacement. Additionally, understanding home safety considerations can help you avoid electrical hazards during maintenance. Checking your blender’s user manual can also provide specific guidance on compatible seals and gasket parts to ensure proper fit and function. Properly inspecting the seal surface before reassembly can prevent leaks and ensure a tight seal, especially since preventing leaks is the primary reason for gasket replacement. Incorporating proper technique during installation can further enhance the durability of your gasket seal.
Follow Proper Removal Steps
Start by unplugging your blender to guarantee safety. To properly remove seals and gaskets, follow these steps:
- Carefully inspect the seal for damage or wear, noting any cracks or deformities. Regular inspection is vital for early detection of potential leaks. Proper maintenance can prevent premature breakdowns and extend the lifespan of your blender.
- Gently pry the gasket free using a plastic tool to avoid scratching surfaces.
- During removal, check the gasket’s cleanliness—clean it thoroughly to remove residue and debris.
- Replace the gasket if it’s cracked or deformed, and reassemble the parts in the correct order.
- Regularly inspecting and maintaining your blender’s ventilation helps prevent overheating and prolongs the lifespan of seals and gaskets.
- Proper removal also prevents unnecessary damage to delicate components, ensuring longevity and effective sealing.
- Ensuring proper seal installation is essential for maintaining a leak-free blender and optimal performance.
Tips for Cleaning and Maintaining Blender Seals to Prevent Leaks

Regularly inspecting and cleaning your blender’s seal is essential to prevent leaks and guarantee peak performance. To enhance seal longevity, use warm, soapy water to gently clean around the gasket and remove any residue or debris. Avoid harsh cleaners that could degrade gasket materials over time. After cleaning, dry the seal thoroughly to prevent mold and mildew growth. Regular maintenance helps preserve the gasket’s flexibility and fit, reducing the risk of leaks. When cleaning, be careful not to scratch or damage the gasket, as this can compromise its effectiveness. Using a soft brush or cloth ensures gentle cleaning. Proper care and attention to gasket materials will extend the life of your seals and keep your blender running smoothly without leaks.
Common Mistakes That Damage Blender Seals and Gaskets
Many common mistakes can damage your blender’s seals and gaskets over time. Overfilling the blender puts extra strain on the seals, increasing the risk of leaks. Using harsh cleaning agents or ignoring signs of wear and tear can also weaken these essential components.
Overfilling Blenders Regularly
Overfilling your blender can lead to significant damage to the seals and gaskets, causing leaks and reducing the appliance’s lifespan. When you add too much, you increase the risk of blender noise, making the motor work harder. This can cause motor overheating, risking seal failure. To avoid this, keep these tips in mind:
- Fill no more than 2/3 full to prevent spillage.
- Leave room for ingredients to move freely.
- Use pulse mode for thick mixtures instead of continuous blending.
- Regularly check for signs of strain, like excessive noise or overheating.
Overfilling not only damages seals but also strains your motor, leading to leaks and costly repairs. Properly filling your blender preserves its seals, gaskets, and overall performance.
Using Harsh Cleaning Agents
Using harsh cleaning agents can quickly damage your blender’s seals and gaskets, leading to leaks and costly repairs. Strong chemicals can cause seal deterioration by breaking down the rubber and silicone materials. Instead, opt for gentle cleaning solutions like dish soap and warm water. Avoid abrasive scrubbers or harsh chemicals such as bleach or ammonia, which can weaken the seal integrity over time. To help you remember, here’s a quick comparison:
| Cleaning Agent Type | Effect on Seals | Recommended Use |
|---|---|---|
| Harsh chemicals | Seal deterioration | Use sparingly or not at all |
| Mild soap | Preserves seals | Regular cleaning |
| Abrasive scrubbers | Damages seals | Avoid completely |
Choosing appropriate cleaning agents ensures your blender stays leak-free longer.
Ignoring Wear and Tear
Neglecting to monitor and address signs of wear and tear can considerably harm your blender’s seals and gaskets. Over time, cracks or deformities develop, leading to leaks. To prevent this, check for:
- Dry or cracked seals that need proper seal lubrication.
- Gaskets made from incompatible materials causing deterioration.
- Visible damage or deformation that compromise gasket integrity.
- Ignoring minor leaks, which worsen with continued use.
Using the correct gasket material is vital for compatibility, preventing early failure. Regular inspections help catch issues early, saving you from costly repairs. Maintaining proper seal lubrication keeps components supple and functional. Don’t overlook these signs—addressing wear and tear promptly ensures your blender stays leak-free and performs at its best.
When to Seek Professional Help for Seal and Gasket Repairs

Knowing when to call in a professional can save you time and prevent further damage to your equipment. If your DIY troubleshooting and creative repair efforts don’t stop the leak or if the seal and gasket issue worsens, it’s time to seek expert help. Attempting complex repairs without proper tools or experience can lead to more costly damage. If you notice persistent leaks, cracks, or difficulty reassembling your blender, a professional technician’s skill is essential. They have the right equipment and knowledge to diagnose underlying problems accurately. Don’t risk further damage by forcing repairs beyond your comfort zone. Remember, timely professional assistance ensures your blender gets fixed correctly and maintains ideal performance, saving you from repeated repairs or replacement costs down the line.
How Proper Seal and Gasket Care Can Extend Your Blender’s Lifespan

By regularly inspecting your blender’s seals, you can catch damage early before it worsens. Using proper cleaning techniques helps prevent buildup that can deteriorate gaskets over time. Replacing seals promptly ensures your blender stays leak-free and lasts longer.
Regular Seal Inspection
Have you ever wondered how a simple inspection can considerably extend the life of your blender? Regular seal inspection is key. It helps you catch issues early, ensuring your gasket materials stay effective and your seal longevity remains high. To keep everything in top shape, check for:
- Cracks or tears in the gasket material
- Warping or deformities around the seal
- Residue buildup that could hinder sealing
- Signs of wear or hardening
Proper Cleaning Techniques
Ever wonder how proper cleaning can considerably extend your blender’s lifespan? Regularly cleaning your blender accessories, including the seal and gasket, is key. Use warm, soapy water to gently wash all parts, avoiding harsh scrubbing that can damage seals. After cleaning, dry everything thoroughly to prevent moisture buildup that could cause mold or deterioration. Pay special attention to the gasket area, removing any debris or residue. Applying a small amount of seal lubrication during cleaning helps maintain flexibility and creates a barrier against leaks, prolonging the gasket’s life. Avoid using abrasive cleaners or brushes that could compromise the seal’s integrity. By following these proper cleaning techniques, you ensure your blender operates smoothly and leaks are kept at bay, ultimately extending its lifespan.
Timely Seal Replacement
Regular cleaning keeps your blender’s seal and gasket in good shape, but over time, wear and tear can still lead to leaks or poor performance. To prevent this, timely seal replacement is crucial. When replacing seals, consider these key steps:
- Check the gasket material for cracks or deterioration.
- Apply a light layer of seal lubrication to ensure a smooth fit.
- Replace worn seals promptly to avoid leaks.
- Use the correct gasket type recommended by your blender’s manufacturer.
Proper seal lubrication helps maintain flexibility, while selecting the right gasket material ensures durability. Addressing these issues early extends your blender’s lifespan and maintains ideal performance. Don’t wait for leaks—regular seal checks and replacements keep your blender running smoothly.
Troubleshooting Persistent Leaks Despite Seal Maintenance

Despite maintaining your seals and gaskets properly, persistent leaks can still occur, signaling underlying issues that require investigation. Often, the root cause lies in compromised seal integrity or incompatible gasket material. Even with regular maintenance, the gasket material may degrade over time or react with cleaning agents, reducing its effectiveness. Check for signs of wear, cracks, or warping around the gasket. Ensure the gasket is properly seated and not over-tightened, which can distort the seal. Sometimes, the seal surface itself may be uneven or damaged, preventing a tight fit. Addressing these issues involves inspecting the gasket material quality and the seal surface regularly, replacing any worn components promptly, and ensuring proper installation to prevent ongoing leaks.
Frequently Asked Questions
Can Using Homemade or DIY Seals Prevent Blender Leaks?
Using DIY solutions or homemade remedies to prevent blender leaks isn’t the best idea. While it might seem cost-effective, homemade seals often don’t fit perfectly or withstand regular use, increasing the risk of leaks. Instead, invest in proper replacement seals designed for your blender model. Regularly inspect and replace worn gaskets to guarantee a tight seal, preventing leaks and keeping your blender functioning smoothly.
Are There Specific Brands Known for Longer-Lasting Seals?
You’ll be amazed at how some brands stand out for their durability! Brands like Vitamix and Blendtec are renowned for their long-lasting seals thanks to their strong reputation and high-quality materials. These brands prioritize material durability, ensuring your blender stays leak-free longer. When choosing, look for trusted names with positive reviews; their seals are built to endure daily blending adventures without leaks, making your kitchen routine smoother and more reliable.
How Often Should Seals and Gaskets Be Replaced in a Standard Blender?
You should replace seals and gaskets every 1 to 2 years, depending on their seal longevity and how well you sustain them. Regular gasket maintenance, like cleaning and checking for wear, helps prevent leaks. If you notice cracks, hardening, or leaks during use, it’s time to replace them sooner. Staying attentive to gasket condition ensures your blender remains leak-free and functions smoothly over time.
Do Different Blender Models Require Unique Seal and Gasket Types?
Yes, different blender models often require unique seal and gasket types. You need to pay attention to seal compatibility and gasket materials to guarantee proper fit and function. Manufacturers design seals specifically for their models, considering factors like temperature and liquid exposure. Always check your blender’s manual or contact the manufacturer to find the correct seal and gasket types, preventing leaks and ensuring ideal performance.
What Are the Environmental Impacts of Disposing of Old Seals and Gaskets?
Think tossing old seals and gaskets in the trash is harmless? Think again. Disposing of them improperly can harm recycling programs and lead to chemical disposal issues, contaminating soil and water. Instead, you should consider recycling options or safe disposal methods. By doing so, you protect the environment from harmful chemicals, reduce waste, and support eco-friendly practices. Your small act can make a big difference in preserving our planet.
Conclusion
Think of your blender’s seals and gaskets as the skin that keeps everything inside. When you care for them properly, they act like a sturdy fence, preventing leaks and keeping your appliance running smoothly. Neglect them, and cracks can form, letting chaos spill out like a broken dam. By giving your seals the attention they deserve, you’ll extend your blender’s life and keep the kitchen chaos at bay, blending happily for years to come.