
TL;DR
In small closet studios, placement and strategic treatment matter more than foam. Moving your rig away, sealing gaps, and using simple DIY solutions can dramatically improve sound quality. The key is controlling reflections and leaks, not just absorbing sound inside the room.
Imagine your tiny closet turned makeshift studio — echoey, boxy, and full of unwanted noise bouncing around. The truth is, the biggest improvements come from where you place your gear and how you treat the surfaces, not just slapping foam panels everywhere.
Most people reach for foam first, but that’s backwards. The real game-changer? Moving your rig out of earshot, sealing gaps, and understanding the difference between dampening and soundproofing. In this guide, I’ll show you how smart placement and DIY tricks can turn that cramped closet into a professional-sounding space — or better yet, a noise-free zone for your work.
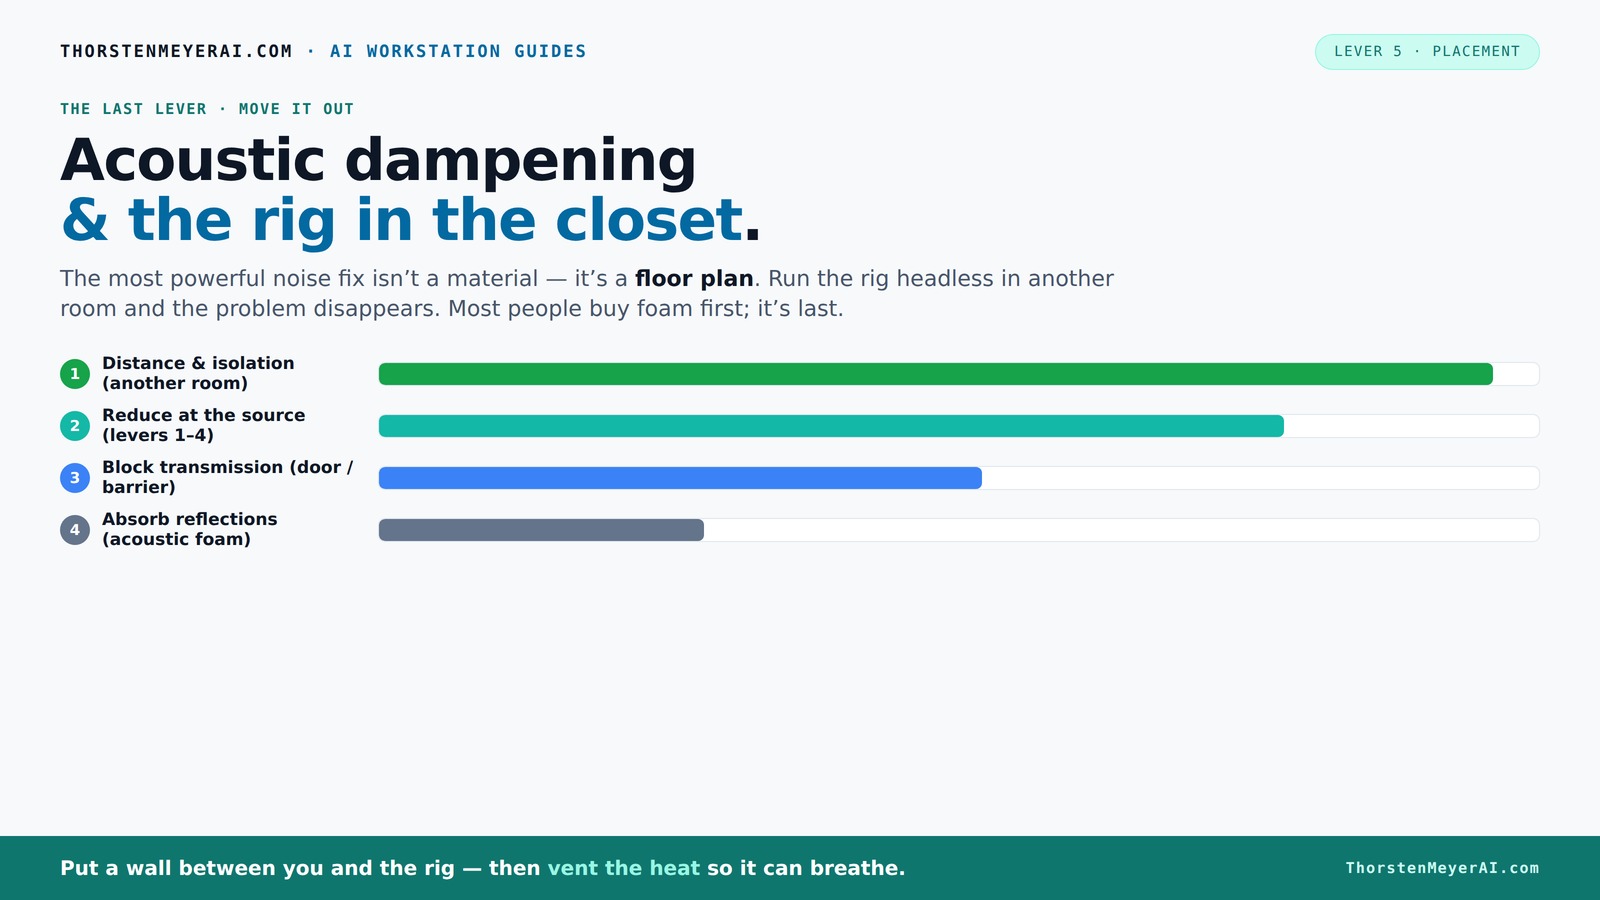
Acoustic dampening
& the rig in the closet.
The most powerful noise fix isn’t a material — it’s a floor plan. A rig you can’t hear because it’s in another room beats any amount of foam. Tap the approaches in Part 1 to see what actually works.
(another room)
(levers 1–4)
(door / barrier)
(acoustic foam)
Contain the noise, not the heat
Key Takeaways
- Distance is the most effective noise reduction — put your rig in another room if possible.
- Sealing gaps around doors and vents is crucial to prevent sound leaks. Learn more about effective sealing techniques in the acoustic treatment resources.
- Treat reflection points on walls and ceilings before focusing on corners.
- Proper ventilation is essential when placing a rig in a sealed space.
- DIY solutions like blankets and rugs can dramatically improve sound quality without high costs.

Focusound 52 Pack Acoustic Foam Panels 1" x 12" x 12" Sound Proof Foam Panles Soundproofing Noise Cancelling Wedge Panels for Home Office Recoding Studio with 300PCS Double-Side Adhesive
Soundproofing - Acoustic foam panels triangular grooves structure for better noise absorption, helps to reduce and absorb unwanted...
As an affiliate, we earn on qualifying purchases.
As an affiliate, we earn on qualifying purchases.
Why Moving Your Rig Is the Easiest Way to Silence Noise
The best way to cut noise? Put distance between your loud computer and yourself. When your rig is in another room or a closet, the sound just doesn’t trouble you anymore.
For example, I set up my AI training server in the basement. From my desk upstairs, I barely notice it’s running — even when the fans spin up during heavy loads. You can do the same. Just make sure your network connection is solid, and the rig has good airflow. No amount of foam will beat simply distancing yourself from the noise source.

OFCOX 60 PCS All-in-One Acoustic Guitar Maintenance & Starter Kit | Includes Strings, Thumb Picks, 3-in-1 Restring Tool, Bridge Pins, Strap, Picks, Fretboard Stickers, Chord Chart for Beginners
EFFICIENT RESTRINGING WORKFLOW Includes a 3-in-1 multifunctional tool combining string winder, hardened steel wire cutter, and bridge pin...
As an affiliate, we earn on qualifying purchases.
As an affiliate, we earn on qualifying purchases.
The “Rig in the Closet”: How to Keep It Cool Without Turning It Into an Oven
Putting a hot, powerful machine in a closet sounds perfect — quiet and out of sight. But there’s a catch: heat builds fast. A sealed closet traps warmth, turning your noise solution into a potential fire hazard.
To avoid this, you need ventilation. Think of a simple setup: a quiet exhaust fan pulling hot air out and cool air coming in through passive vents. For more advanced solutions, consider a custom soundproof cabinet with ducted airflow and thermostatic control. These options keep your rig cool, quiet, and safe.
According to experts, a sealed, unventilated space can raise ambient temperatures by 20–30°F, leading to thermal throttling and louder fans. Proper airflow isn’t just about comfort — it’s about performance and longevity. Check out this guide for detailed cooling strategies.

Sound Addicted - Studio Monitor Isolation Pads for 5 Inch Monitors, Pair of Two High Density Acoustic Foam which Fits Most Speaker Stands | SMPad 5
SMPad 5 is made out of the highest quality acoustical foam (50kg/m^3 density).
As an affiliate, we earn on qualifying purchases.
As an affiliate, we earn on qualifying purchases.
Acoustic Dampening vs. Soundproofing: What’s the Real Difference?
Acoustic dampening and soundproofing aren’t the same. Dampening reduces echoes and reflections inside a space, making it sound less “boxy.” Soundproofing blocks sound from leaking out or in.
For example, foam panels on the walls soften internal reflections, but won’t stop your neighbor from hearing your voice through the door. Conversely, sealing gaps and adding dense barriers prevents sound from escaping, but doesn’t necessarily improve echo inside the room.
To illustrate, I used foam panels to tame my closet’s echo, then added weatherstripping to the door to block leaks. Combining both gives a balanced, professional sound environment. Understanding this tradeoff helps you decide where to focus your efforts—whether reducing internal echo or preventing sound leaks, each approach affects your final sound quality differently.

Soundproof Room Divider with Wheels, 72 x 66 Inch Freestanding Room Partition Wall, Portable Temporary Wall, 3 Panel Acoustic Screen, Cubicle Privacy Panels for Office, Study, Classroom (Light Grey)
【Privacy & Focus Support】This room divider panel helps reduce visual interruptions and supports focused work by separating desks...
As an affiliate, we earn on qualifying purchases.
As an affiliate, we earn on qualifying purchases.
Where to Focus Your Treatment: Walls, Ceiling, or Corners?
In a tiny closet, treating every surface matters. But prioritizing is key. Start with the reflection points — the walls directly behind your mic and your monitor.
For example, I hung foam panels behind my microphone and on the ceiling to cut down slap echo. Bass traps in the corners help with low frequencies, but in small spaces, broad coverage on walls and ceiling can make a bigger difference. Recent creators emphasize that focusing solely on corners ignores the main reflection points, which are often the surfaces directly surrounding your recording setup. Addressing these primary reflection points reduces the most problematic echoes and creates a clearer sound stage, while over-focusing on corners might leave other reflection issues unaddressed, limiting your room’s acoustic improvement.
How to Seal Your Closet Door Without Turning It Into a Soundproof Fortress
Doors are usually the weak link in sound isolation. Gaps around the door let sound leak out like a sieve. Sealing these gaps is quick and cheap but highly effective. For detailed sealing tips, see this guide.
For instance, I taped a thick moving blanket over my closet door and added weatherstripping around the edges. This simple fix cut noise transmission significantly. For a more permanent solution, consider a soundproof door seal kit or a custom acoustic door panel.
Remember, even small gaps can let a surprising amount of sound escape. Sealing them ensures your efforts in dampening the room actually work. The tradeoff here is that overly sealed doors can make access inconvenient or reduce ventilation, so balance sealing with practical usability.
Are Bass Traps Really Necessary in a Tiny Closet?
Bass traps target low-frequency buildup, which is a common issue in small, reflective spaces. But do you need them? It depends. Find out more about room treatment options at this resource.
If your recordings sound boomy or muddy, bass traps in the corners can help. For example, I installed foam bass traps in my closet’s corners, and the difference was night and day — clearer vocals, less rumble.
However, if your space only has mild low-frequency issues, broad wall coverage with absorption material may suffice. The key is to match your treatment to your room’s specific sound profile. Overusing bass traps can also dampen desired low-end energy, so consider your specific needs carefully. Sometimes, strategic placement and proper room setup can mitigate low-frequency issues without extensive bass trapping.
DIY Tricks: Using Blankets, Rugs, and Foam for Maximum Effect
In small spaces, simple DIY solutions often outperform expensive treatments. Thick blankets draped over shelves, rugs on the floor, and foam panels taped to walls can all reduce echo and improve clarity. For more ideas, see the acoustic dampening guide.
For example, I covered my closet’s walls with leftover foam and hung a thick blanket over the door. The result? Less slap echo, warmer sound, and a more controlled environment — all without breaking the bank.
Strategically placing soft furnishings at reflection points maximizes their effectiveness. For example, placing a rug beneath your desk or a blanket behind your microphone can significantly dampen reflections. Think of these as cost-effective ways to tailor your space’s acoustics without complex construction. The tradeoff is that DIY solutions may not be as precise or durable as professional treatments, but their flexibility and affordability make them invaluable for small or budget-conscious setups.
Power, Ventilation, and Cables: Keep Your Closet Rig Running Smoothly
Running a high-powered rig in a closet isn’t just about noise. It’s about keeping it cool and accessible. Proper ventilation is key.
I installed a quiet exhaust fan and ran cables through a small hole sealed with acoustic grommets. This setup keeps airflow steady without letting noise escape.
For safety and performance, avoid clutter and ensure your power supply is reliable. Proper cable management prevents accidental disconnections and keeps your setup tidy.
Additionally, consider regular maintenance—dusting filters and checking airflow—to prevent overheating. The tradeoff here is that adding ventilation can introduce noise if not properly designed, so select quiet fans and use ducting to minimize sound transfer. Good cable management not only prolongs your equipment’s life but also reduces accidental disconnections, keeping your workflow smooth and your setup safe.
Frequently Asked Questions
What’s more effective: acoustic dampening or soundproofing?
Dampening reduces reflections and echo inside the room, while soundproofing blocks sound from escaping. For a quiet workspace, combine both: treat reflection points and seal gaps.Where should I place the mic in a closet booth?
Place the mic at reflection points, usually a few inches from the wall behind it, and aim for a position that minimizes direct reflections and room noise.How do I stop sound from leaking through the closet door?
Seal gaps with weatherstripping, hang a thick blanket or moving pad over the door, and consider a door seal kit for best results.Do I need bass traps in a tiny closet studio?
If your recordings sound muddy or boomy, bass traps in the corners can help. Otherwise, broad wall and ceiling absorption may be enough.How much treatment do I need in a small closet?
Focus on reflection points and the door first. Use DIY solutions like blankets and foam, and add bass traps only if low-frequency issues persist.Conclusion
In tiny closets, silence and clarity come from smart placement and targeted treatment, not just foam panels. Moving your rig away, sealing gaps, and understanding what makes sound bounce or leak turn a noisy space into a professional-sounding studio.
Remember, your closet can become a perfectly tuned workspace — or just a loud, echoey box. The choice is yours. Take control, and your sound will thank you for it.