
To tell if your yeast is alive without wasting flour, mix a teaspoon of yeast with warm water (around 110°F) and a pinch of sugar. If it’s active, you’ll see foam or bubbles within 10 minutes, indicating fermentation. You can also do a quick vinegar test by adding yeast to vinegar and watching for fizzing. If no signs appear, your yeast might be dead—but if you want more simple tests, keep going.
Key Takeaways
- Mix a teaspoon of yeast with warm water (105–110°F) and a pinch of sugar, then look for foam or bubbles within 10 minutes.
- Use the float test: place a small amount of yeast in water; if it floats, it’s active.
- Observe for bubbling or frothy foam during a quick activation test in warm water.
- Store yeast properly in an airtight container in a cool, dark place to maintain activity and prevent false negatives.
- Check expiration date; expired yeast is less likely to be alive and active for baking.
![Easy@Home Vaginal pH Test Strips: [5 Pack] Yeast Infection & BV (Bacterial Vaginosis) Testing Kit for Women with Swabs, Feminine pH Balance Health Tests, at Home pH Level Tester #EVPH-S](https://m.media-amazon.com/images/I/41cQ0r2hDAL._SL500_.jpg)
Easy@Home Vaginal pH Test Strips: [5 Pack] Yeast Infection & BV (Bacterial Vaginosis) Testing Kit for Women with Swabs, Feminine pH Balance Health Tests, at Home pH Level Tester #EVPH-S
Test to Identify – Quickly check vaginal pH levels to detect acidity or alkalinity, helping identify early signs…
As an affiliate, we earn on qualifying purchases.
As an affiliate, we earn on qualifying purchases.
How Can You Tell If Your Yeast Is Still Alive?

Wondering if your yeast is still alive? The first step is to check your yeast storage. Yeast should be kept in an airtight container in a cool, dark place or in the fridge to stay viable longer. If it’s been sitting out or exposed to moisture, it might have died. To test it, look for fermentation indicators—like bubbling or foamy activity—when mixed with warm water and a pinch of sugar. These signs show active fermentation. If your yeast doesn’t bubble or foam after 10 minutes, it’s likely dead and won’t help your dough rise. Proper yeast storage helps maintain its viability, so always store it correctly to ensure it’s still alive before baking. Additionally, understanding the role of temperature in yeast activity can help you optimize fermentation conditions for better results. Maintaining proper airflow around your yeast and dough can also influence fermentation success, preventing spoilage or inactive yeast. Good yeast vitality is essential for consistent baking outcomes, and being aware of storage conditions can significantly extend your yeast’s lifespan.

pH Test Strips for Kombucha Brewing 0-6 (0.5 Intervals) 100pc Kit
★ Designed for kombucha: Pre and post first ferment (1F)
As an affiliate, we earn on qualifying purchases.
As an affiliate, we earn on qualifying purchases.
Why Testing Your Yeast Before Baking Matters

Testing your yeast before baking guarantees it’s still viable, so your bread rises properly. It helps you avoid failed batches that waste time and ingredients. By checking first, you save effort and resources in the long run. Incorporating Free Floating yeast can also influence how quickly your dough ferments, so verifying activity is especially important. Understanding auditory processing can enhance your ability to recognize yeast activity signals during testing. Additionally, being aware of creative storytelling techniques can help you better understand the importance of proper yeast activation for consistent baking results. Modern kitchen appliances with smart sensors can even assist in monitoring fermentation progress and alert you when your dough is ready. Recognizing the impact of temperature on yeast activity is also crucial for accurate testing and successful baking outcomes.
Ensures Yeast Viability
Because active yeast is essential for successful baking, verifying its viability before mixing it into your dough is important. Ensuring your yeast is alive guarantees a proper fermentation process, leading to better rise and flavor. When testing yeast, consider its freshness and how it was stored, as these factors impact yeast cultivation and activity. Viable yeast will produce carbon dioxide quickly, signaling it’s ready for baking. Additionally, testing helps you avoid wasting flour and other ingredients on inactive yeast, saving time and money. Confirming yeast viability also provides confidence that your baking will turn out as expected, especially for delicate breads or pastries. Proper storage conditions impact yeast activity, and yeast should be within its expiration date. Warm water activates yeast efficiently, and visible foam indicates active yeast. Yeast cultivation is an important aspect that can influence the success of your baking, and using fresh yeast can further improve your results. Maintaining optimal storage conditions for yeast can help preserve its activity over time. Additionally, understanding yeast vitality can help you troubleshoot any issues with your dough not rising properly.
Prevents Baking Failures
Failing to verify your yeast before baking can lead to unexpected setbacks, such as flat bread or dense pastries. When yeast fermentation doesn’t occur as expected, your dough won’t rise properly, resulting in poor texture and flavor. Testing your yeast confirms it’s alive and active, giving you confidence that your dough will rise as intended. Additionally, understanding how glycolic acid benefits skin can help you maintain healthy skin, especially in skincare routines that involve exfoliation. To improve your testing accuracy, learn about yeast viability tests that can help you determine freshness more reliably. Performing simple yeast tests at home, such as the float test, can save you from wasting ingredients and ensure your baking success. Moreover, selecting the right support breakfast options can enhance your morning routine and ensure you start your day energized. Regularly checking the spinal alignment during your baking process can also help you maintain consistent results.
Saves Time and Resources
Verifying your yeast before baking saves you both time and resources by preventing wasted ingredients and effort. If your yeast isn’t alive, your dough won’t ferment properly, leading to failed rises and spoiled batches. Testing guarantees your yeast is active, saving you from unnecessary setbacks. Proper storage humidity plays a role in maintaining yeast viability, so keep it in a cool, dry place. Active yeast initiates fermentation quickly, saving you time in the rising process. Additionally, early detection avoids wasting flour and other ingredients on unviable yeast. Maintaining the correct storage humidity is essential for yeast viability and activity. Ensuring optimal environmental conditions can extend the life of your yeast and keep it ready for successful baking. To further enhance yeast activation, consider the temperature of your water, as warm water can accelerate fermentation without risking killing the yeast. Using the right temperature for your water can make a significant difference in how quickly your yeast ferments. Proper yeast storage not only preserves its activity but also helps in achieving consistent baking results. This simple check streamlines your baking, reduces frustration, and ensures consistent results.

Bread Illustrated: A Step-By-Step Guide to Achieving Bakery-Quality Results At Home
As an affiliate, we earn on qualifying purchases.
As an affiliate, we earn on qualifying purchases.
Quick No-Waste Tests to Check Yeast Vitality

If you want a quick way to determine if your yeast is still active, there are simple no-waste tests you can try. One effective method involves using your knowledge of yeast storage; if your yeast has been stored properly in a cool, dry place or fridge, it’s more likely to be alive. For alternative tests, sprinkle a small amount of yeast onto a clean, dry surface or into warm water (without wasting flour). If it bubbles or forms a foamy layer within a few minutes, your yeast is feasible. These quick checks don’t require additional ingredients and help you avoid wasting flour or other resources. They’re practical, straightforward, and give you instant insight into your yeast’s vitality. Proper storage methods can greatly influence the success of your yeast activation.
yeast freshness indicator
As an affiliate, we earn on qualifying purchases.
As an affiliate, we earn on qualifying purchases.
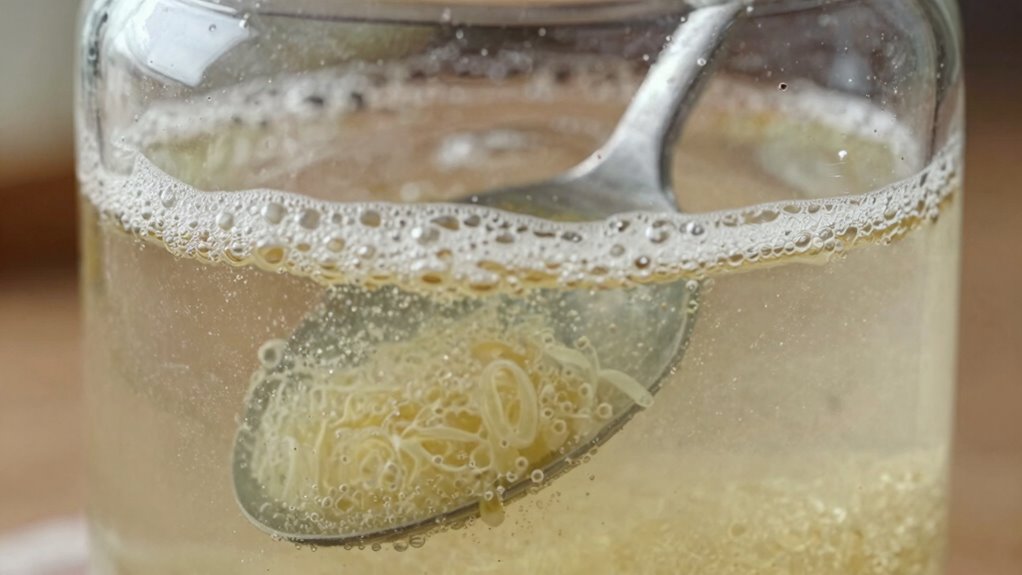
Use Warm Water and Sugar to See if Your Yeast Is Active
To test if your yeast is active, start by preparing warm water—around 110°F is ideal. Add a teaspoon of sugar and give it a gentle stir, then wait about 5–10 minutes. If bubbles form and foam appears, your yeast is alive and active.
Prepare Warm Water
Starting with warm water is an easy way to check if your yeast is alive. Using the right temperature facilitates proofing techniques and encourages fermentation processes. Confirm the water feels warm but not hot, around 105–110°F (40–43°C). This temperature activates the yeast without killing it. Stirring in a small amount of sugar helps jumpstart the process and makes it easier to observe activity. Proper preparation of warm water sets the foundation for accurate testing. It also prevents false negatives caused by water that’s too cold or hot. When combined with sugar, this method allows you to see signs of life quickly. Remember, consistent water temperature and timing are vital for reliable results in determining if your yeast is still active.
Add Sugar and Wait
Adding sugar to the warm water creates a nutrient-rich environment that encourages yeast activity. This step kickstarts the fermentation process and reveals if your yeast is alive through sugar activation. When you mix sugar and warm water, active yeast will feed on the sugar, producing bubbles and foam within 10 minutes. This visual cue confirms the yeast’s vitality. Here’s a quick overview:
| Step | Result |
|---|---|
| Add sugar to water | Creates a nutrient source for yeast |
| Wait 10 minutes | Observe for foam or bubbles |
| No foam or bubbles | Yeast may be inactive or dead |
| Active yeast | Produces visible fermentation |
| Inactive yeast | No change, needs replacing |
This simple test helps you determine if your yeast is ready to ferment and activate sugar effectively.
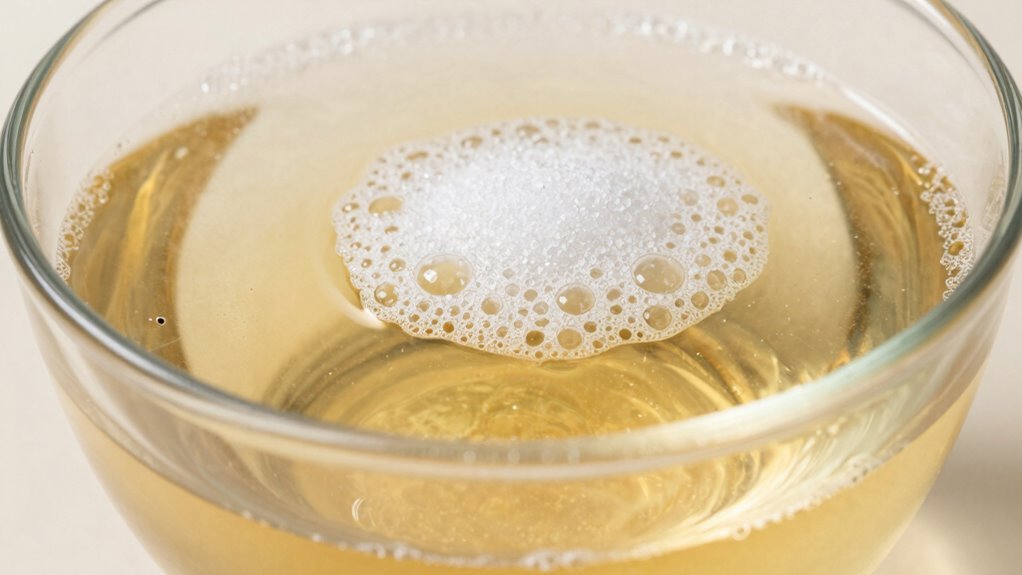
Vinegar Test: A Fast Way to Confirm Yeast Vitality

If you’re unsure whether your yeast is still alive, the vinegar test offers a quick and simple way to find out. Pour a small amount of vinegar into a glass, then add a teaspoon of your yeast. If the mixture begins to fizz or bubble within a few minutes, it indicates active yeast capable of fermentation. This reaction shows that your yeast health is good and that the fermentation process can proceed. Keep in mind, however, that a lack of reaction doesn’t necessarily mean your yeast is dead—it might just be inactive. To get a clearer picture, consider other signs of vitality.
- Vinegar’s acidity helps reveal yeast activity without wasting flour
- Fizzing indicates active fermentation process
- No reaction suggests yeast may be dormant or dead
- Quick test saves time compared to traditional methods
Signs Your Yeast Is Alive : Foam, Bubbles, and More

When your yeast is alive and active, it produces visible signs like foam and bubbles during proofing. These fermentation indicators show that the yeast is consuming sugars and releasing carbon dioxide. You’ll notice foam forming on the surface of your mixture, and bubbles will appear throughout, indicating active fermentation. The yeast texture also changes; it becomes bubbly and frothy, rather than flat or paste-like. These signs confirm that your yeast is alive and capable of leavening dough effectively. Keep an eye out for consistent bubbling over time—if the foam persists and bubbles keep forming, your yeast is healthy. Conversely, a lack of foam or bubbles suggests your yeast may be dead or inactive, and it’s time to test or replace it.
Troubleshooting Dead Yeast and How to Store It Properly

Even if your yeast shows signs of activity during proofing, it’s important to recognize what happens when it’s dead or inactive. Troubleshooting dead yeast involves checking its freshness and understanding proper yeast storage to extend its shelf life. If your yeast doesn’t foam or bubble, it might be past its prime. To prevent this, store yeast in an airtight container in a cool, dry place or the refrigerator. Proper yeast storage helps maintain its essential properties longer. Remember, expired yeast won’t activate properly, wasting your ingredients.
- Keep yeast away from heat and humidity
- Use airtight containers for storage
- Check expiration dates regularly
- Freeze if not used within the shelf life
Frequently Asked Questions
Can Expired Yeast Still Be Revived?
Expired yeast can sometimes be revived if it’s still alive, but it’s not guaranteed. To test, warm a bit of water with sugar and add your yeast; if fermentation begins within 10 minutes, it’s active. Use proper yeast storage tips, like keeping it airtight in a cool, dark place, to extend its life. If it doesn’t foam, consider getting fresh yeast to ensure your baked goods rise properly.
How Long Does Live Yeast Typically Last?
Live yeast typically lasts about 2 to 4 months if stored properly. To maximize its storage duration, keep it in an airtight container in a cool, dry place or in the refrigerator. Avoid exposure to heat and moisture, which can kill the yeast. Always check the expiration date and test it with warm water and sugar before using. Proper storage methods help guarantee your yeast stays active longer.
What Are Common Signs of Dead Yeast?
Think of dead yeast as a silent, dormant forest—lacking life’s usual signs. When checking fermentation indicators, dead yeast won’t bubble or produce foam. Its smell turns stale or sour, and the texture remains flat and dense rather than airy and lively. If these signs appear, your yeast is likely dead, and it’s time to start fresh. Don’t waste your efforts on something that’s no longer active.
Does Temperature Affect Yeast Vitality?
Yes, temperature affects yeast vitality considerably. During yeast fermentation, ideal temperature regulation guarantees the yeast stays active, producing the gases needed for rising dough. Too hot, and the yeast can die; too cold, and fermentation slows or stops. Maintaining a consistent, warm environment around 75-80°F (24-27°C) helps keep your yeast alive and vigorous, guaranteeing successful baking results.
Can Alternative Tests Detect Dead Yeast Accurately?
Think of alternative tests like a detective’s toolkit—some tools, like the float test, can help you check yeast freshness, but their test accuracy varies. I once used a simple microscope to spot live yeast cells, which proved more reliable than relying solely on smell or appearance. While no test is perfect, combining methods increases your chances of accurately detecting dead yeast, saving you from wasted ingredients.
Conclusion
Imagine your yeast as tiny workers, quietly waiting to bring your bread to life. When they’re active, they bubble and foam like a lively fountain, ready to transform simple ingredients into warm, fragrant loaves. By testing their vitality first, you guarantee your flour isn’t wasted on dead yeast. Keep them stored properly, and they’ll stay ready to spring into action whenever you need them. Trust your tests, and bake with confidence—your perfect loaf is just a proof away.